Habe mir einen Multifunktionsfarblaserdrucker gegönnt, da diese mittlerweile wirtschaftlicher sind als die Tintenspritzer. Ich drucke sehr wenig, daher trocknen die Patronen ständig aus und ein neuer Satz Patronen kostetet fast 50 Euro.
Beim Einrichten gab es nur ein Problem, dies betraf das Einrichten von Google Cloud Print.
Laut Beschreibung muss man nur im Menü „Druckservereinstellungen“ – „Druckservereinstellungen“ – „Google Cloud Print“ – „Drucker registrieren“ anklicken.
Dies klappte bei mir aber nicht, das Problem war, dass der DNS Server nicht automatisch per DHCP vergeben wird.
Dies kann man durch ein Häkchen berichtigen. Entweder man lässt den DNS vom DHCP ausliefern oder man hinterlegt diesen manuell (InternetRouter oder zB.: Google DNS 8.8.8.8).
Google CloudPrint am Handy

Ich habe GCP auf meinem Samsung Galaxy S6 installiert...ohne Erfolg -> Handy neu gestartet und nun kann ich vom SGS6 auf meinem Drucker von überall aus ausdrucken.
Das ist ideal wenn man am stillen Örtchen zum Beispiel Amazon Retourscheine ausdrucken möchte (ja da fallen mir solche Dinge ein ;))
Scan2Mail mit GMail Account
Ich habe eine seperate Mailadresse bei Gmail erstellt und folgende Anleitung befolgt:
Step by step „how to“ scan to Gmail email with Dell E525w MFP
(a) Today, Wed Jan 20, 2016, we got this to work
(b) Before proceeding, you’ll need to get your E525w connected to your network. We found the Dell instructions dense, but ultimately we figured this out. Also, you should login to the printer’s web interface via a browser. You should also print from one of your computers. We had (b1) connected printer to WiFi, (b2) logged into printer’s web interface, and (b3) successfully printed prior to taking the steps below.
(c) Also, via the printer web interface, we entered our desired personal email address in the Address Book. At the end of this set of instructions you’ll want to test scan something to an email of your choosing, and you will find it easy and convenient to choose from a pre-loaded email address book. This should take you 1-2 mins.
(d) To make scan to email work, we largely followed the genius instructions provided by Mark from Minneapolis, Minnesota (UID = markshaheen). Thank you, Mark.
(e) We needed to modify Mark’s instructions slightly for the E525w, and so we’ll repeat in a start-to-end cookbook fashion, but note that Mark gets all the credit.
(f) NOTE: We did not want to alter any settings in our existing Gmail account so we created a special email account for our Dell E525w printer. We used a naming convention „DellScans4OurLastname@gmail.com“ and whenever we refer to EMAIL ADDRESS below we mean this new gmail address. Maybe not needed. Probably not needed. However, we didn’t want to add 2-factor authentication to our existing email account because we’ve got it wired to many other things and didn’t really want to take the time to analyze the implications.
INSTRUCTIONS FOR SCAN-TO-EMAIL FOR DELL E525W MFP [this is specifically Gmail]
[1] Go to gmail EMAIL ADDRESS account and activate 2-step (i.e., 2-factor) authentication
[2] Go to App Passwords
[3] Set-up for printer. We picked „Other“ and then entered Dell E525w for device name. Gmail then generated a password. We copied this password (and photographed our screen in case we lost it)
[4] Log into printer vie web browser.
NOTE: even [4] might prove tricky for some. We went to our printer and navigated via Menu then System then Report/List then „System Settings“ report and printed. This 2-pg report contains useful info, including the device service tag and IP address.
[5] Click „Print Server Settings“ on left nav and we was 3 tabs: Print Server Reports, Print Server Settings and Security. Click Print Server Settings tab.
 On the Print Server Settings tab you’ll see several sub-menu choices. Click TCP/IP
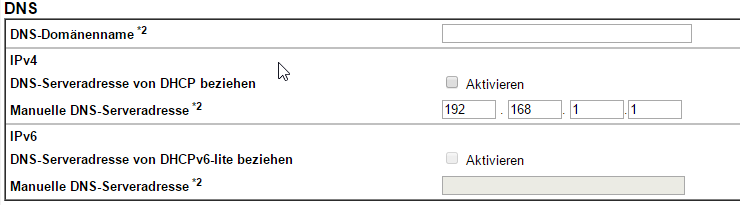
[7] Look for 2nd boxed grouping of fields with DNS label. Note, this is a really bad and confusing user interface. So for clarity, the top grouping of fields, TCP/IP Setting starts with the „Host Name“ field and ends about 16 fields later with „AutoConfigure Gateway Address“ and you need to skip over all of this and look below to the next group, i.e., DNS.
 On our interface, under the DNS field grouping, the 3rd line down reads „Get DNS Server Address from DHCP“ with an „Enable“ box. Uncheck the box
[9] Immediately below, on the 4th line in this section, you’ll see „Manual DNS Server Address“ and ours fields were filled with the IP address of our printer. Type in 8.8.8.8
NOTE: we’ve got no idea why 8.8.8.8 works. We did what Mark instructed. At this point we felt like well educated monkeys, but we checked our ego at the door…
[10] Click Apply New Settings (note: we forget when and where this happened, but at least twice our changes resulted in the web interface telling us it needed to restart our printer. Whenever we encountered this we hit clicked on „restart“ and it took 1-3 mins. No big deal)
[11] Either under the Printer Server Settings tab or using the left hand nav, click on E-mail Alert.
(note: more bad user interface. who would think that „E-mail Alert“ contained the email server settings. anyway, press on…)
[12] We had to enter values for several fields. Here we needed to do something a little diff than Mark instructed because when we skipped the POP info it didn’t work. Anyway, below you’ll see all the fields and we suggest you try entering your data equivalents.
ACHTUNG PW muss das generierte PW sein, welches bei APP-PWs erstellt wurde !!!
Primary SMTP Gateway: smtp.gmail.com
SMTP Port Number: 465
E-mail Send Authentication: *SMPT AUTH (AUTO)
SMTP Login User: EMAIL ADDRESS
SMTP Login Password: your PW
Re-enter SMTP Login Password: your PW
POP3 Server Address: pop.gmail.com
POP3 Port Number: 110
POP User Name: EMAIL ADDRESS
POP User Password: your PW
Re-enter POP User Password: your PW
Reply Address: EMAIL ADDRESS
[13] Click Apply New Settings
[14] On left nav, click „Print Server Settings“ tab and then click Security tab
[15] On the Security tab you’ll see several sub-menu choices. Click SSL/TLS
[16] On the SSL/TLS user interface we encountered two boxed field groupings. The top box contained 3 fields and the 3rd field read „SMTP – SSL/TLS Communication“ and it had a drop down box with choices. Select *SSL/TLS
[17] Click Apply New Settings
After step [17] the printer web interface may have brought up a Restart dialogue box. We don’t recall. However, we do know that after [17] we went to our printer, put in a 1-pg test doc and scanned successfully to two separate addresses in our pre-loaded Address Book.
WICHTIG
unter Sicherheit SMTP-SSL aktivieren (auf SSL/TLS stellen).
If this fails to work for you, accepts our commiseration. We probably left something out. You can find Mark’s original post here.
THANKS, MARK!